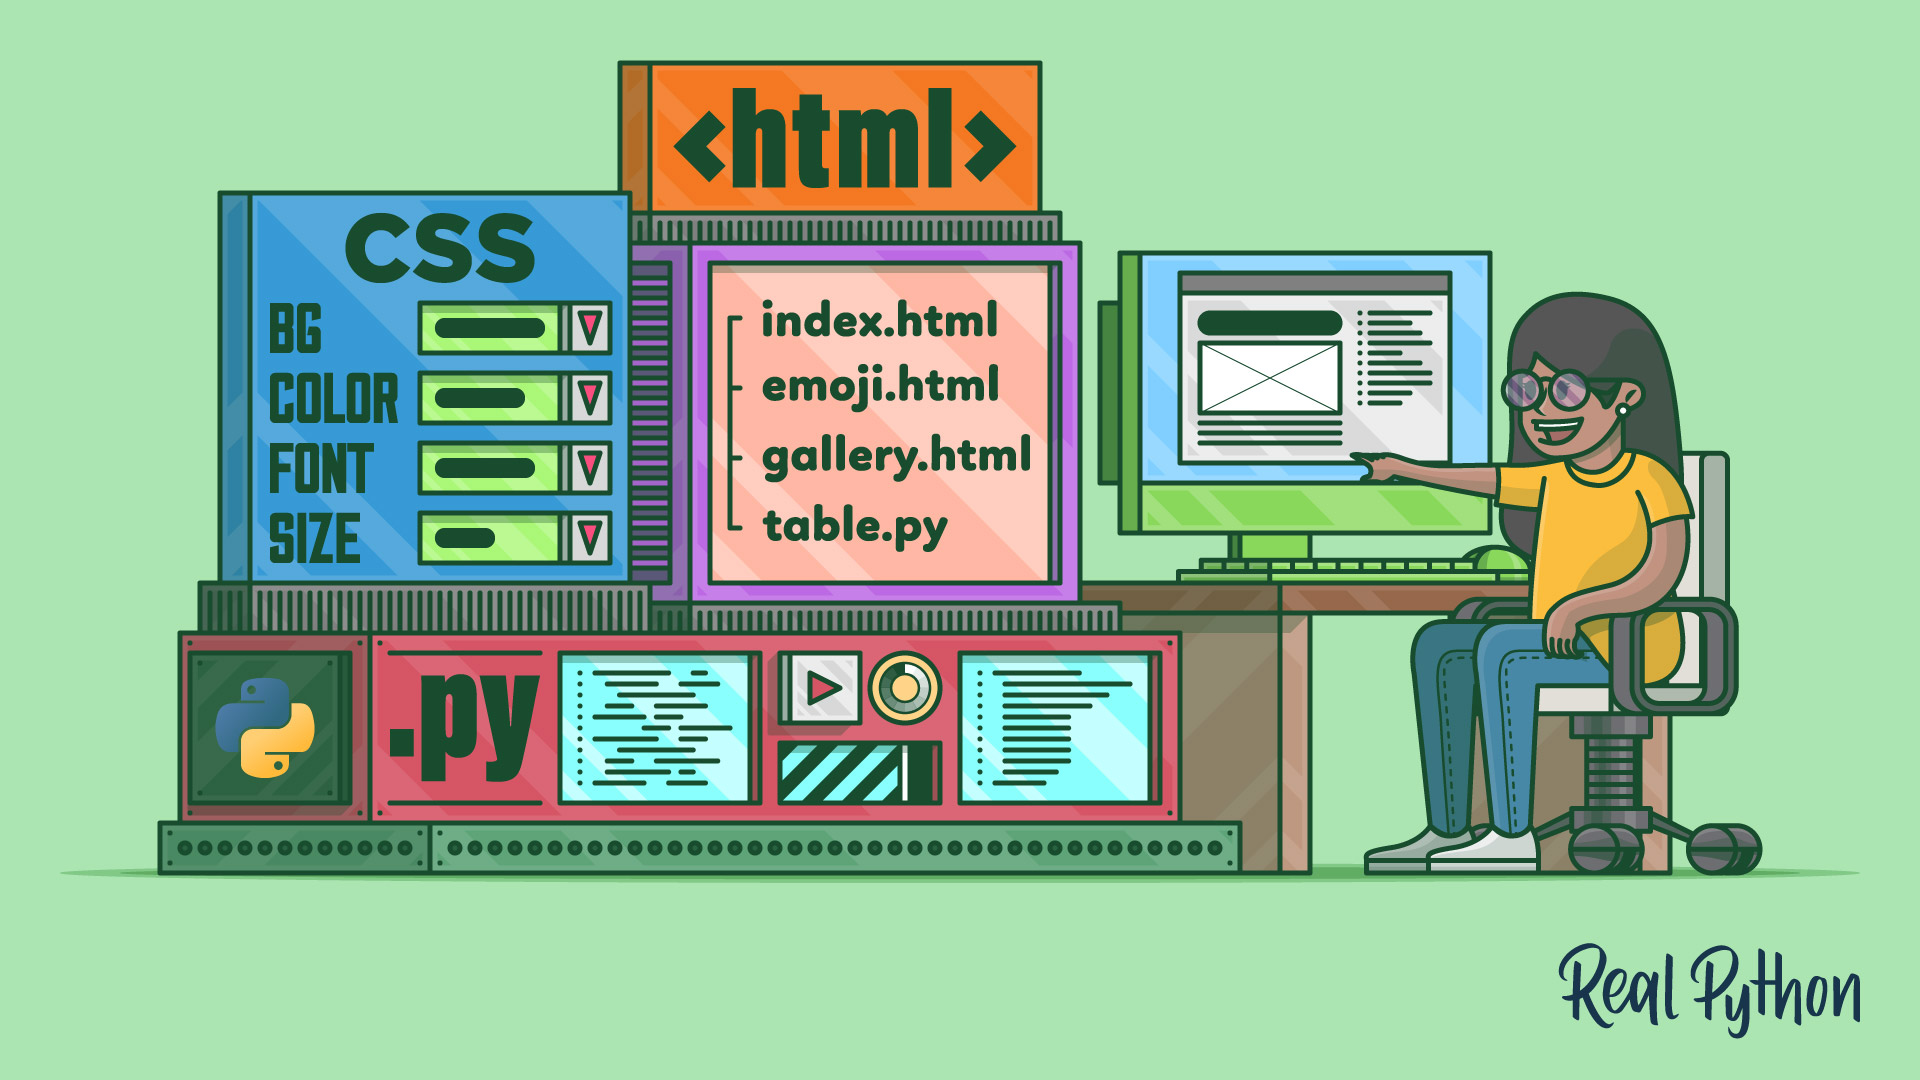
Combining HTML, CSS, and Python equips you to build dynamic, interactive websites. HTML provides the structure, CSS adds styling, and Python can be used to interact with and manipulate the HTML content. By understanding how these technologies work together, you can create visually appealing and functionally robust websites.
This tutorial guides you through the basics of creating HTML files, using CSS for styling, and leveraging Python to manage HTML content programmatically.
By the end of this tutorial, you’ll understand that:
- Python can be used alongside HTML and CSS to create dynamic web content.
- HTML, CSS, and Python are sufficient for developing basic web applications.
- Learning HTML, CSS, and Python simultaneously is feasible and beneficial.
- Learning HTML and CSS first can give you a solid foundation before tackling Python.
- You can mix Python with HTML to automate and enhance web development.
Explore how HTML and CSS can enhance your Python projects, enabling you to create impressive websites and understand web frameworks like Flask and Django more deeply.
You’ll get an introduction to HTML and CSS that you can follow along with. Throughout this tutorial, you’ll build a website with three pages and CSS styling:
While creating the web project, you’ll craft a boilerplate HTML document that you can use in your upcoming web projects. You may find that the source code will come in handy when you’re working on future projects. You can download it here:
Free Bonus: Click here to download the supplemental materials for this tutorial, including a time-saving HTML template file.
After learning the basics of HTML and CSS, you’ll find ideas on how to continue your journey at the end of the tutorial.
Create Your First HTML File
Think of any website that you’ve recently visited.
Maybe you read some news, chatted with friends, or watched a video.
No matter what kind of website it was, you can bet that its source code has a basic <html> tag at the beginning.
HTML stands for HyperText Markup Language. HTML was created by Tim Berners-Lee, whose name might also ring a bell for you as the inventor of the World Wide Web.
The hypertext part of HTML refers to building connections between different HTML pages. With hyperlinks, you can jump between pages and surf the Web.
You use markup to structure content in a document. In contrast to formatting, the markup defines the meaning of content and not how it looks. In this section, you’ll learn about HTML elements and their roles.
Writing semantic HTML code will make your documents accessible for a wide range of visitors. After all, you want to enable everybody to consume your content, whether they’re visiting your page with a browser or using screen reading tools.
For each HTML element, there’s a standard that defines its intended use. Today, the standards of HTML are defined by the Web Hypertext Application Technology Working Group (WHATWG). The WHATWG plays a similar role for HTML as the Python Steering Council does for Python.
Approximately 95 percent of websites use HTML, so you’ll be hard-pressed to avoid it if you want to do any web development work in Python.
In this section, you’ll start by creating your first HTML file. You’ll learn how to structure your HTML code to make it readable for your browser and for humans.
The HTML Document
In this section, you’ll create a basic HTML file. The HTML file will contain the base structure that most websites are built with.
To start things off, create a file named index.html with some text:
index.html
Am I HTML already?
Traditionally, the first file of your website is called index.html.
You can think of the index.html page as akin to the main.py or app.py file in a Python project.
Note: Unless your server is configured differently, index.html is the file that the server tries to load when you visit the root URL. That’s why you can visit https://www.example.com/ instead of typing the full https://www.example.com/index.html address.
So far, the only content of index.html is a plain Am I HTML already? string.
Still, go ahead and open index.html in your browser:
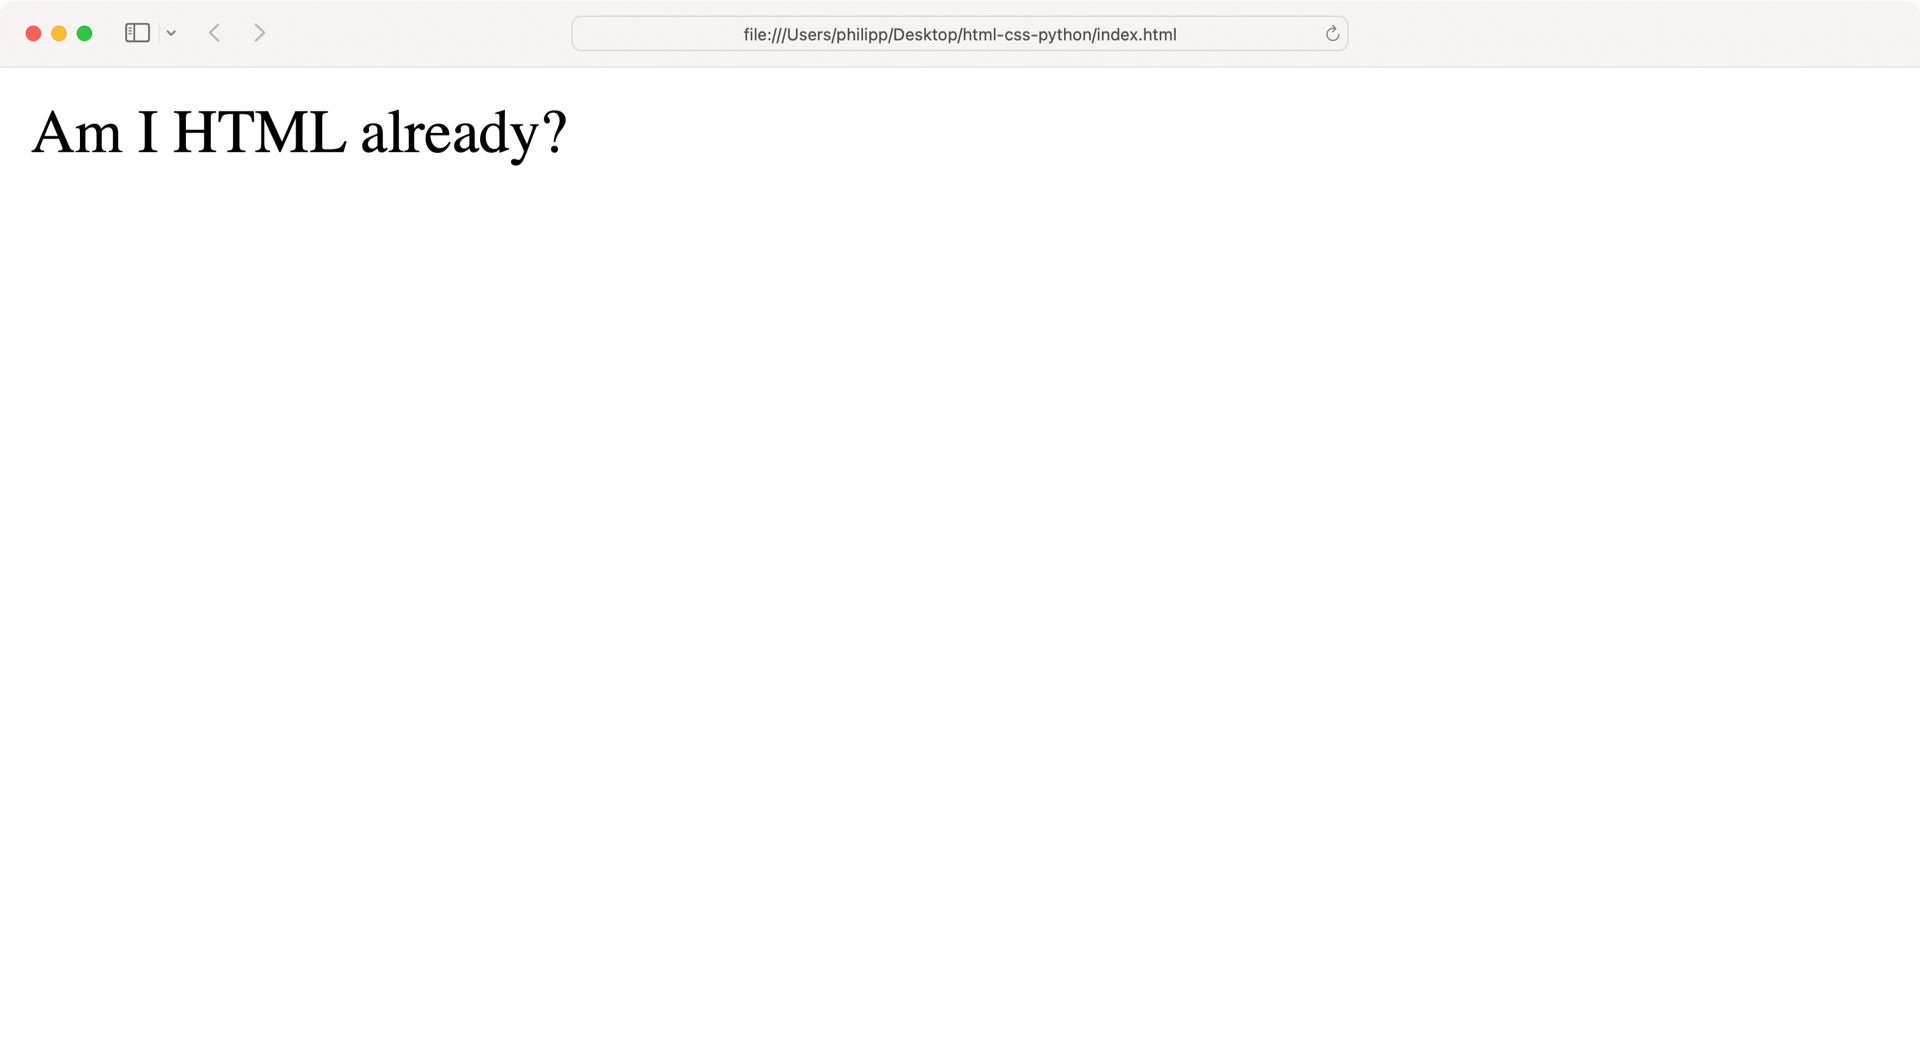
Your browser displays the text without complaining. It seems the browser can handle an HTML file, even if its only cue is the extension. That’s good to know, but this behavior also has a downside.
Browsers will always try to render HTML documents, even when the HTML syntax of your document is not valid. Very seldomly, the browser itself will show you something like a SyntaxError, similar to what Python does when you try to run invalid code. This means that you may not notice if you’ve shipped invalid code, which can cause issues for your website visitors.
Note: If you want to validate the HTML code that you write, then you can upload your HTML file to W3C Markup Validation Service. This linting tool analyzes your code and points out errors.
Update index.html and create a minimal valid HTML document by adding the code below:
index.html
 1<!DOCTYPE html>
 2<html lang="en">
 3<head>
 4    <meta charset="utf-8">
 5    <title>Am I HTML already?</title>
 6</head>
 7</html>
This code is the most minimal valid HTML document that you can get away with.
Strictly speaking, you could even ditch the lang attribute in line 2.
But adding the right language subtag is recommended to declare which natural language your document contains.
Note: In this tutorial, you’ll stick with English and use the en language tag.
You can visit the official language subtag registry to find all the other language tags.
The language attribute makes it easier for translation tools to work with your website and will make your website more accessible. Screen readers in particular rely heavily on the language declaration of an HTML document to choose the right language mode for synthesizing the content.
At its root, any HTML document that you build will probably follow the structure of the example above.
But there’s one important HTML element missing.
Open index.html and add <body> below <head>:
index.html
1<!DOCTYPE html>
2<html lang="en">
3<head>
4 <meta charset="utf-8">
5 <title>Am I HTML already?</title>
6</head>
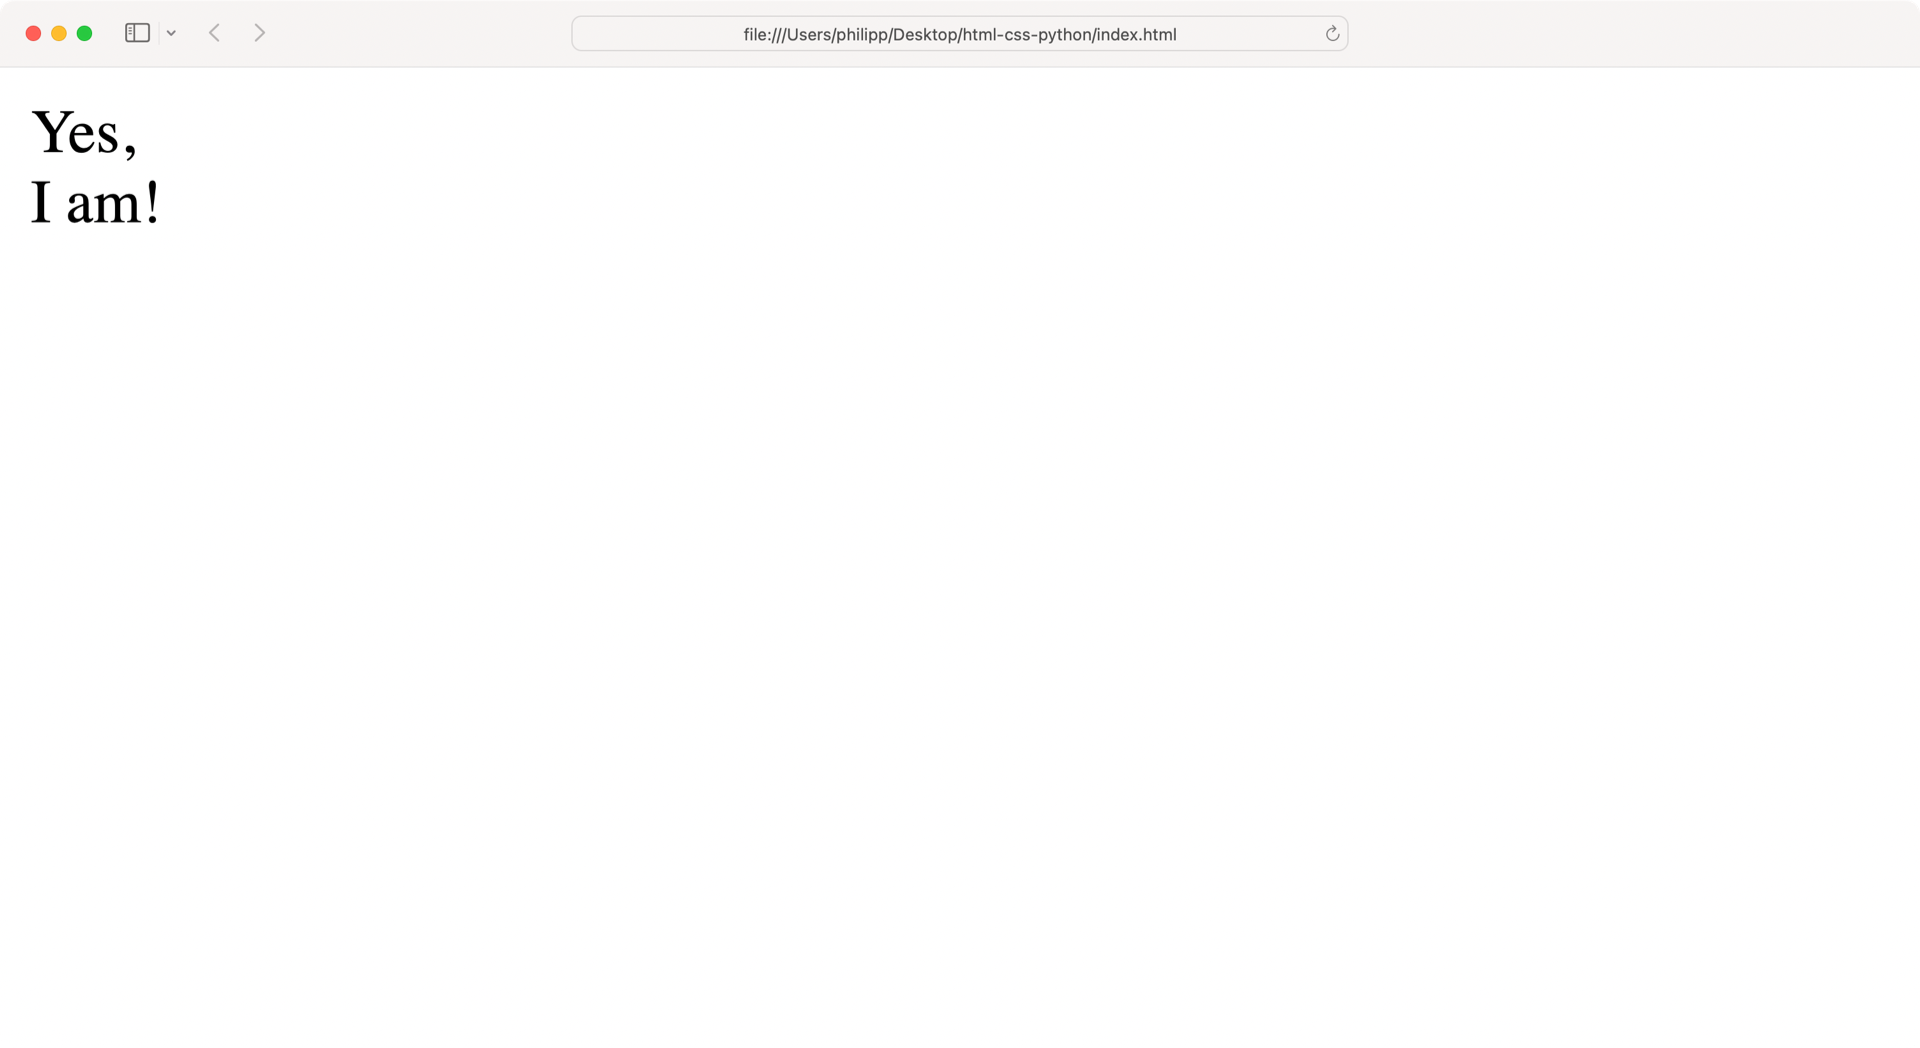
7<body>
8Yes,<br>I am!
9</body>
10</html>
Any valid HTML file must start with a doctype declaration.
In this tutorial, you’ll be using <!DOCTYPE html>, which tells the browser that the document contains HTML5 code and should render your page in standard mode:
If a browser finds an outdated, incomplete or missing doctype at the start of the page, they use “quirks mode”, which is more backwards compatible with old practices and old browsers. (Source)
After the doctype declaration, you have an opening <html> tag.
In line 12, you can find the corresponding closing </html> tag.
Most elements in HTML have an opening tag, some content in between, and a closing tag at the end.
These parts can even be on the same line, like the <title> element in line 5.
Other elements, like <meta> in line 4, don’t have a matching closing tag, so they don’t contain any content.
These empty elements are so-called void elements.
They stand independently and may not even contain attributes. One such example is <br> in line 8, which creates a line break.
HTML tags start with an angle bracket (<) and end with an angle bracket (>).
The tag names in between the angle brackets are usually pretty descriptive and state what the HTML element is meant for.
A good example is <title> in line 5, in which the content defines the title of your page.
The <body> block contains the mass of your content.
You can think of <body> as the part of the HTML document that you can interact with in your browser.
Sometimes the tag names are abbreviated, like the line break element <br> in line 8.
To get an overview of other HTML tag names, visit Mozilla’s HTML elements reference.
Once you’ve familiarized yourself with the structure of your HTML document, reload index.html in your browser and check out how your website looks:
Awesome, you’re now displaying the content of your first proper website!
There’s a good chance that you’ll start any web project with a structure like the one that you’ve built in this section. To save yourself some work in the future, you can download the HTML boilerplate code by clicking the link below:
Free Bonus: Click here to download the supplemental materials for this tutorial, including a time-saving HTML template file.
In the next section, you’ll improve the base structure that you’ve created so far. To explore why HTML is called a markup language, you’ll add content and structure to your website.
Whitespace and Text Formatting
The only markup that your HTML document has so far is the base skeleton of your website.
Now it’s time to dive in deeper and structure some real content.
To have something to work with, add the text below to the <body> block of index.html:
index.html
<!DOCTYPE html>
<html lang="en">
<head>
<meta charset="utf-8">
<title>Am I HTML already?</title>
</head>
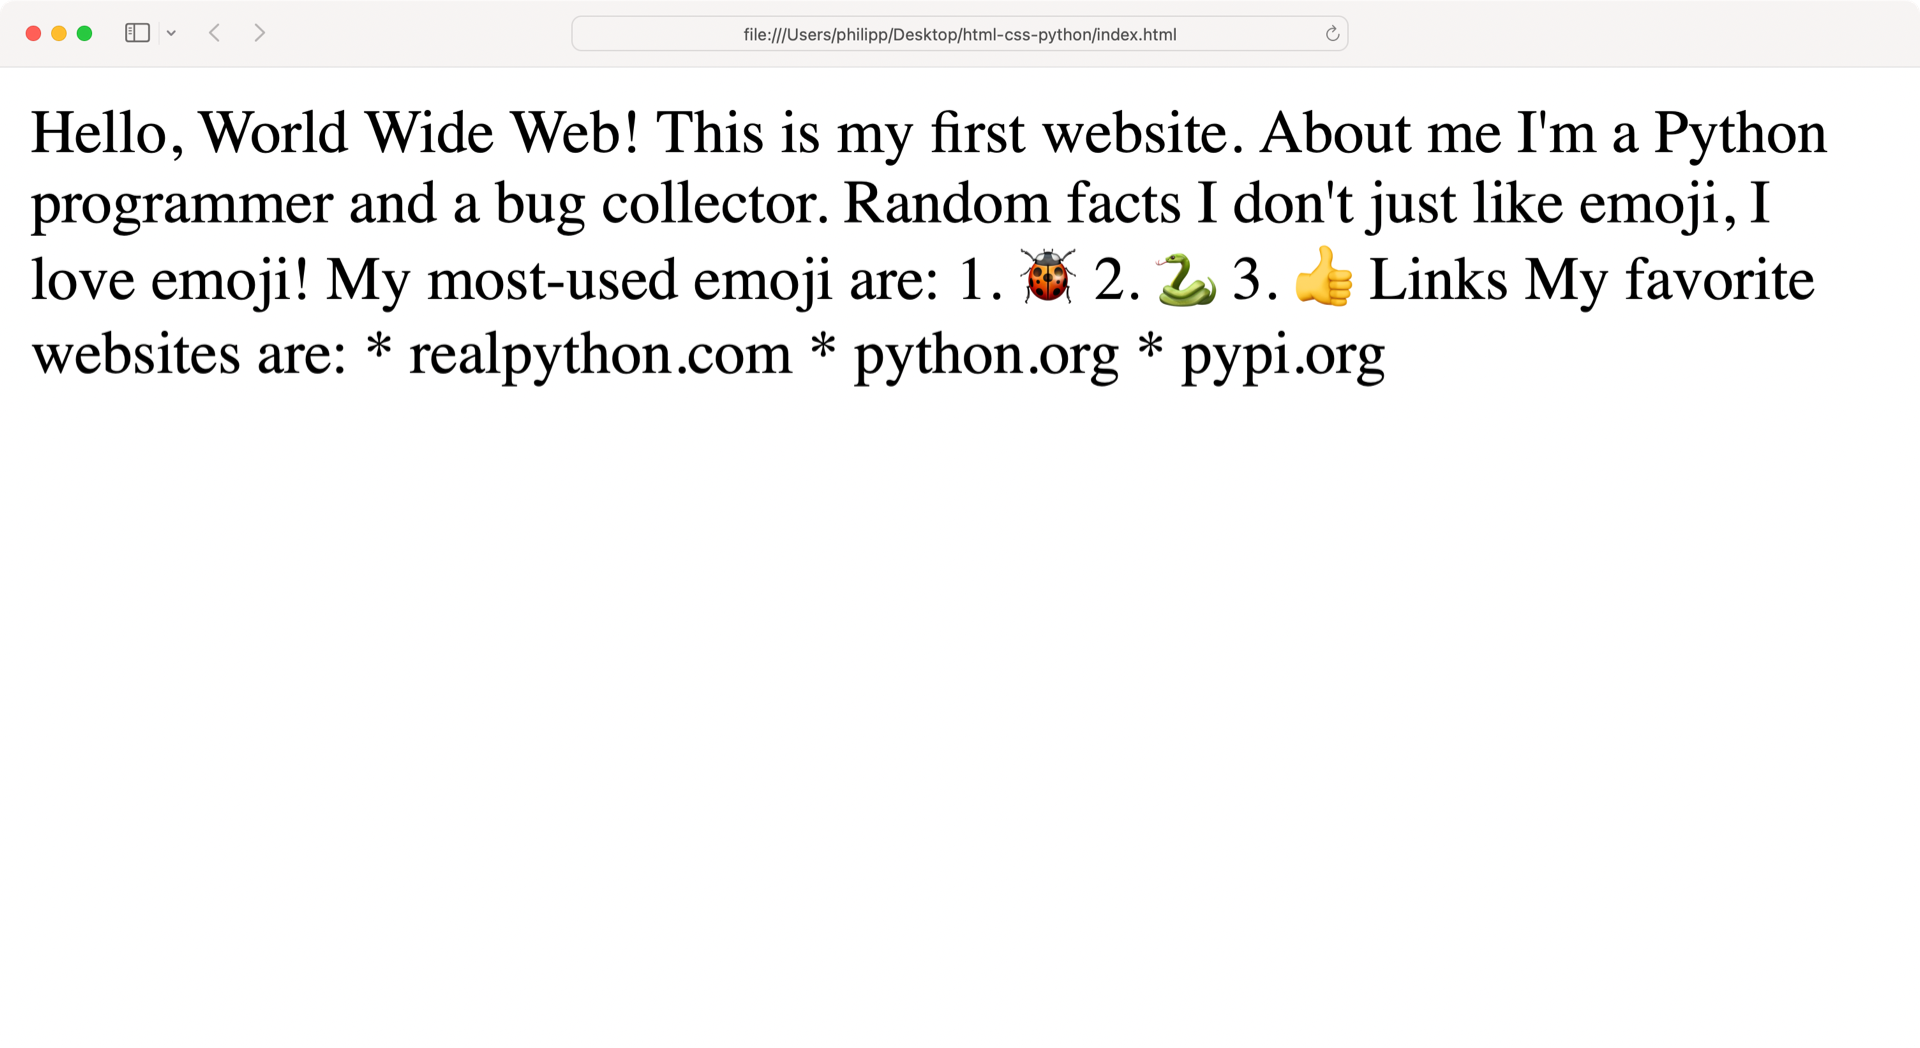
<body>
Hello, World Wide Web!
This is my first website.
About me
I'm a Python programmer and a bug collector.
Random facts
I don't just like emoji,
I love emoji!
My most-used emoji are:
1. 🐞
2. 🐍
3. 👍
Links
My favorite websites are:
* realpython.com
* python.org
* pypi.org
</body>
</html>
When you open the website in your browser, it seems that the browser didn’t recognize any whitespace at all.
Although you distributed your content on multiple lines inside <body>, the browser displays everything as one continuous line:
As a Python developer, you know that whitespace is a vital ingredient in writing beautiful Python code. The indentation of your Python code makes a difference in how Python executes your code.
Without any additional adjustments, browsers collapse multiple spaces, line breaks, or indentation to one space character.
To format your content differently, you must provide further information to the browser.
Go ahead and structure index.html by adding HTML tags to your content:
index.html
1<!DOCTYPE html>
2<html lang="en">
3<head>
4 <meta charset="utf-8">
5 <title>Am I HTML already?</title>
6</head>
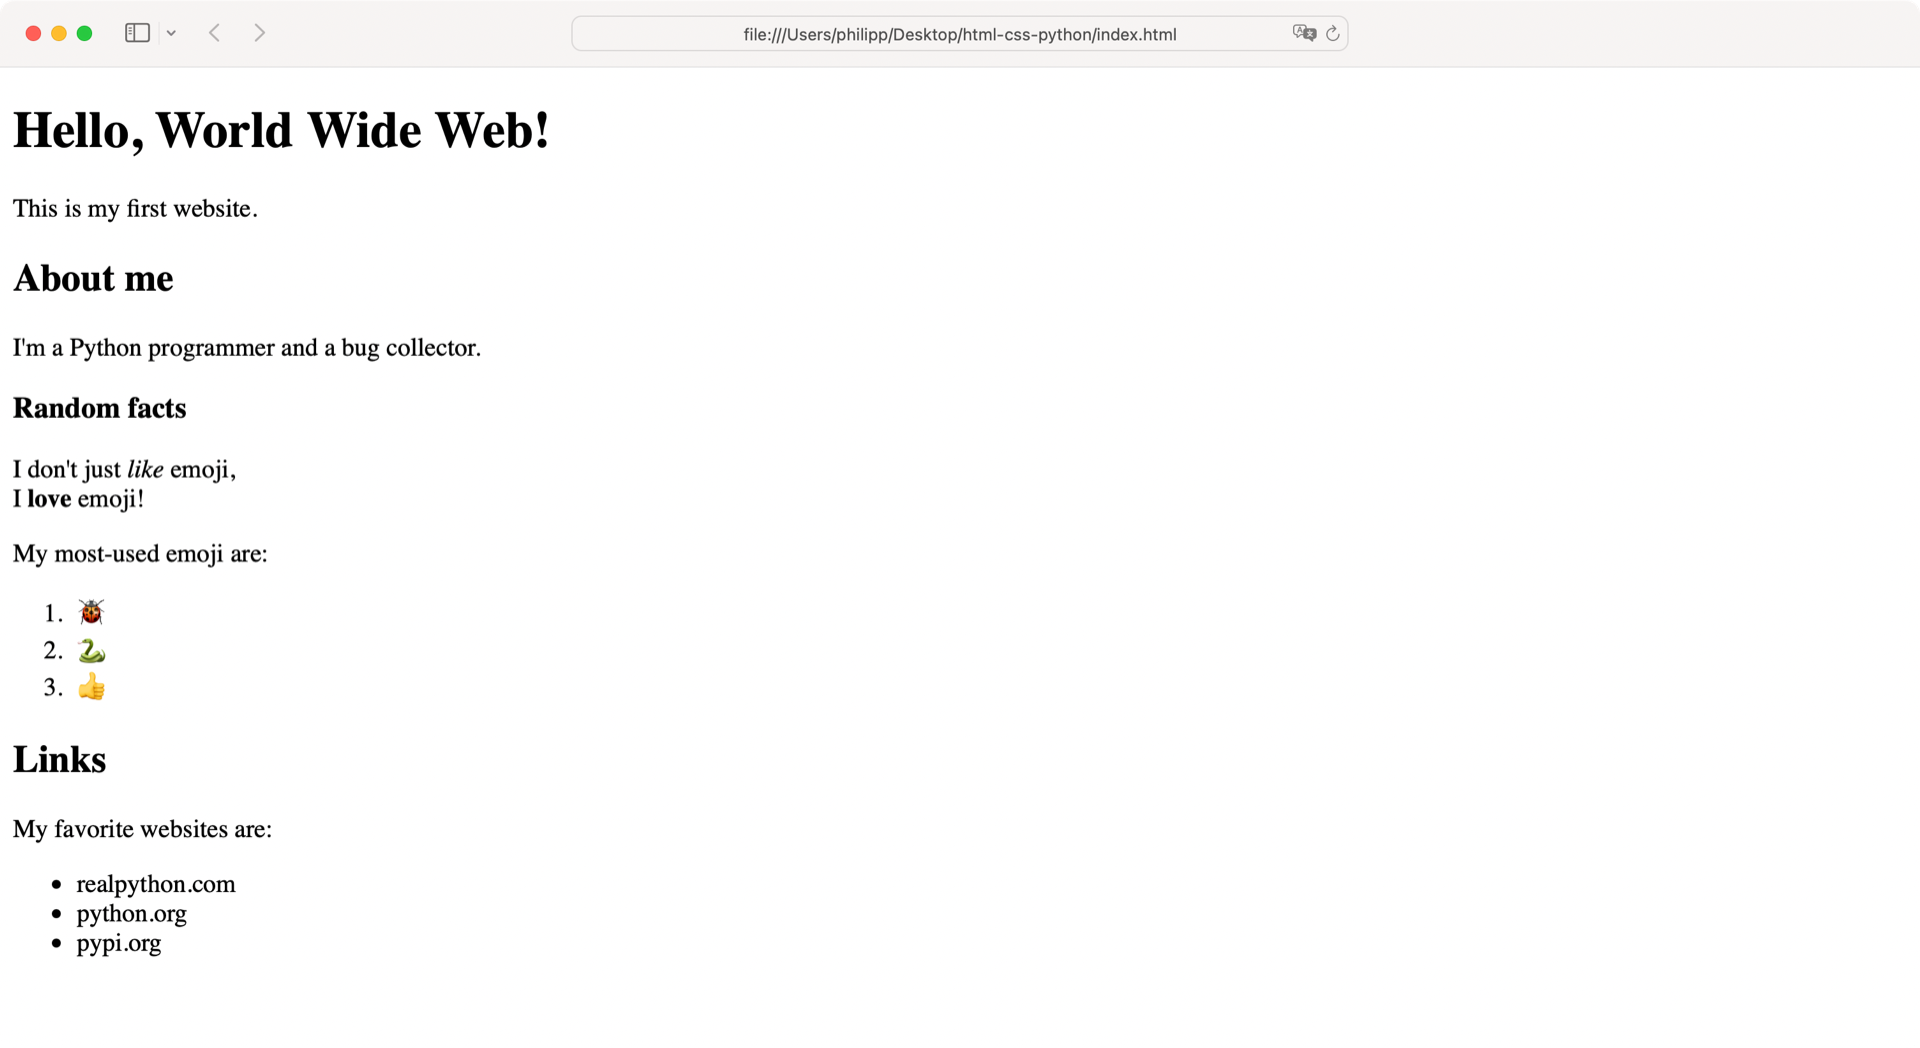
7<body>
8<h1>Hello, World Wide Web!</h1>
9<p>This is my first website.</p>
10
11<h2>About me</h2>
12<p>I'm a Python programmer and a bug collector.</p>
13
14<h3>Random facts</h3>
15<p>I don't just <em>like</em> emoji,<br>
16I <strong>love</strong> emoji!</p>
17<p>My most-used emoji are:</p>
18<ol>
19 <li>🐞</li>
20 <li>🐍</li>
21 <li>👍</li>
22</ol>
23
24<h2>Links</h2>
25<p>My favorite websites are:</p>
26<ul>
27 <li>realpython.com</li>
28 <li>python.org</li>
29 <li>pypi.org</li>
30</ul>
31</body>
32</html>
By wrapping your text in HTML blocks, you give the browser additional information about your intentions for the content. First, have a look at the HTML elements that wrap bigger chunks of text:
| Line | HTML Element | Description |
|---|---|---|
| 8 | <h1> |
Main headline of your website |
| 9 | <p> |
Paragraph, to structure text and related content |
| 11 | <h2> |
Second-level headline, nested below <h1> |
| 14 | <h3> |
Third-level headline, nested below <h2> |
| 18 | <ol> |
Ordered list, typically rendered as a numbered list |
| 26 | <ul> |
Unordered list, typically rendered with bullets (•) |
You can nest headline elements six levels deep.
While you usually only have one <h1> element, you may have multiple <h2> to <h6> tags.
Headline elements section your HTML document and are vitally important for screen readers.
For example, readers may want to jump from headline to headline to navigate your content.
To write valid and accessible HTML, you must ensure that you don’t skip a headline level in your code.
You can think of the headline tags like doors that open onto different floors of a building.
One floor can have multiple exits to other floors.
But remember, you can’t build a third floor if you don’t have a second floor yet.
In other words, there can never be an <h3> element on your page unless you’ve first declared <h2>.
Some of the HTML elements that you used above contain text only. Others contain additional HTML elements that structure the content further:
| Line | HTML Element | Description |
|---|---|---|
| 15 | <em> |
Emphasizes content |
| 16 | <strong> |
Indicates important content |
| 19 | <li> |
List item, must be contained in a list element |
All HTML tags convey meaning. Therefore, it’s vitally important to carefully choose which markup you use for portions of your content. When you use the right semantics, then you enable everybody to consume your content the way that you intended. You make your website accessible for all:
The Web is fundamentally designed to work for all people, whatever their hardware, software, language, location, or ability. When the Web meets this goal, it is accessible to people with a diverse range of hearing, movement, sight, and cognitive ability. (Source)
Some HTML elements are pretty straightforward.
For paragraphs, you use <p>.
Other elements are a bit harder to grasp:
Kushagra Gour provides a great summary in his blog entry Strong vs Em:
If it’s just visual importance, you want
strong. If it alters the sentence meaning, useem.
In other words, em means that you would emphasize the word while speaking. For example, if someone said, “You don’t look bad,” you might wonder, “But do I smell bad?” The placement of emphasis is key to the meaning of the sentence.
If you simply want to draw the reader’s attention to a piece of vocabulary, for example, then you’d probably want to use strong instead.
When in doubt, don’t hesitate to search for HTML names on the Web. You’ll find discussions and usage notes about any HTML element.
Additionally, your browser’s default styling of HTML can give a decent impression by styling elements differently:
With markup, you add meaning to your website’s content. Writing semantically correct HTML is important for understanding your content.
Using proper semantics in your HTML document isn’t just helpful for the browser. It also makes the rendered HTML page accessible for users who consume your content with text-to-speech software.
If you want to learn more about modern HTML, then HTML5 Doctor is a great resource. To learn more about accessibility, you can check out Google’s course on making the Web accessible to all.
Links and Images
Jumping from one website to another is an essential part of the Internet. These references are called hyperlinks, commonly referred to as links. Without links, websites would exist in a silo, and you could only access them if you knew the web address.
Also, you wouldn’t be able to navigate among multiple pages of a website if you didn’t have links that connected the pages. To connect the HTML documents that you’ve created so far, add a navigation menu to your HTML source code:
index.html
<!DOCTYPE html>
<html lang="en">
<head>
    <meta charset="utf-8">
    <title>Am I HTML already?</title>
</head>
<body>
<nav>
    <a href="emoji.html">Emoji</a>
</nav>
<!-- ... -->
</body>
</html>
With the <nav> element, you declare a section that provides navigation.
Inside of <nav>, you add a link with an <a> tag, which is short for anchor.
The href attribute stands for Hypertext Reference, containing the link’s target.
Note: The `