AI-powered code editors have moved beyond novelty to become everyday tools for many Python developers. Instead of having to switch between your editor and a separate AI chat, you can use tools like Cursor and Windsurf that bring AI directly into your workflow. As a result, the Cursor vs Windsurf question is a common one for developers deciding which to adopt.
Both Cursor and Windsurf are VS Code forks that import your keybindings, themes, and Python extensions, and both run the same frontier models. They look similar at first but diverge in how they handle changes as you build.
Cursor focuses on control, surfacing AI-generated edits as reviewable diffs and relying on explicit rules to guide agent behavior. Windsurf focuses on flow, applying edits directly in the editor while using broader workspace context, including terminal output, recent edits, and conversation history, to shape its behavior.
In this tutorial, you’ll compare both editors across:
- AI code completion: How each editor’s completion system behaves and what context it draws on
- Agentic multi-file editing: How each editor handles tasks involving multiple files, directories, and the terminal
- Debugging and error correction: How each editor reviews generated code and integrates with your linter
By the end, you’ll have a clear picture of which editor fits your Python workflow. If you’re coming from VS Code, the Python Development in Visual Studio Code tutorial covers the baseline configuration that carries over to both forks.
The table below helps you choose the right editor at a glance:
| Use case | Cursor | Windsurf |
|---|---|---|
| You want AI-generated changes shown as reviewable diffs before they’re written to your files, guided by explicit rules | ✅ | — |
| You want edits applied directly as the agent works, using a broader workspace context (terminal output, recent edits, conversation history, and memory) | — | ✅ |
Cursor is the better fit if you want to review changes before they’re applied. Windsurf is the better fit if you prefer the agent to apply edits directly in your files as it works, drawing on the broader workspace context. To see how this plays out in completion, context management, and debugging, read on.
Get Your Code: Click here to download the free sample code for the resilient HTTP client you’ll build with Cursor and Windsurf in this tutorial.
Take the Quiz: Test your knowledge with our interactive “Cursor vs Windsurf: Which AI Code Editor Is Best for Python?” quiz. You’ll receive a score upon completion to help you track your learning progress:

Interactive Quiz
Cursor vs Windsurf: Which AI Code Editor Is Best for Python?Test your understanding of how Cursor and Windsurf compare for Python across AI completion, agentic edits, and debugging workflows.
Metrics Comparison: Cursor vs Windsurf
As you work through the hands-on sections and eventually bring either editor into your own Python projects, the table below gives you a quick reference for some key differences you might expect from each tool:
| Metric | Cursor | Windsurf |
|---|---|---|
| IDE support | Standalone VS Code fork plus a JetBrains plugin | Standalone VS Code fork plus plugins for JetBrains IDEs, Vim, Neovim, Xcode, Visual Studio, and more |
| AI code completion | Fast, line-by-line prediction; strong on single-file typed structures | Slower but more structurally aware across interconnected files |
| Startup performance | Faster. Uses lightweight text search that requires no upfront project indexing. | Slower initial response. Builds a semantic map of your project structure before it begins. |
| Debugging performance | Identifies and fixes the root cause in one pass | Reaches passing tests by working around the root cause over multiple iterations |
| Resource impact | Light. Low background CPU and RAM usage. | Heavy. Background indexing can spike local CPU during initial project load. |
| Billing model | Monthly credit pool with unlimited Tab and Auto mode on Pro | Daily and weekly usage quotas that refresh automatically on a schedule |
| Pro plan pricing | $20/month | $20/month |
| Ideal project size | Small to medium codebases where you already know the structure and can target files manually | Large, highly interconnected codebases that benefit from its RAG-based context engine and automatic semantic indexing |
In the next sections, you’ll build a resilient HTTP client in Python from scratch and then send the same prompts to both editors to compare their responses.
Getting Started: Installation
Both editors ship as standalone desktop applications that closely match the VS Code experience. On first launch, they offer to import your local VS Code configuration, copying your keybindings, extensions, themes, and settings so your environment carries over with minimal setup.
To follow the hands-on project later in this tutorial, you’ll also want Python 3.12 or later installed on your system. Beyond that, if you need a full VS Code baseline before starting, the Python Development in Visual Studio Code (Setup Guide) course covers the editor setup from scratch.
Both Cursor and Windsurf offer free plans with enough model access to work through this comparison, though keep in mind that free-tier usage is limited and may run out under heavy use.
Installing Cursor
Head to the Cursor download page and download the correct version for your system. During setup, Cursor offers to import your VS Code configuration, including extensions, keybindings, and themes, so your environment carries over with minimal setup.
Once the editor opens, you’re ready to go. You don’t need to configure anything else yet.
If Cursor is new to you, Real Python’s video course on Tips for Using the AI Coding Editor Cursor covers setup, Agent mode, Plan mode, and model selection in a practical context, making the comparisons later in this tutorial easier to follow.
Installing Windsurf
Download Windsurf from the Windsurf download page and run the installer. The VS Code profile import works identically to Cursor’s.
Windsurf uses the Open VSX extension registry instead of the Microsoft Marketplace. Core tools like the Python extension and debugger are available, but proprietary Microsoft extensions such as Pylance aren’t supported. Instead, Windsurf provides alternatives like Pyright for IntelliSense and type checking, including its own optimized Windsurf Pyright, which covers most common Python workflows.
Building a Resilient HTTP Client in Python
Before exploring each feature in depth, you’ll run the same three-prompt sequence in both editors from scratch. You don’t need any existing code or project. The agents will build everything themselves. Your job is to send the prompts and watch.
Note: LLM output is non-deterministic, so your results may not exactly match what you see here, and that’s expected. The goal is to observe each editor’s workflow patterns, not to replicate the exact output.
Setting Up the Project Directories
Create two empty directories, one for each editor. You can do this from your terminal:
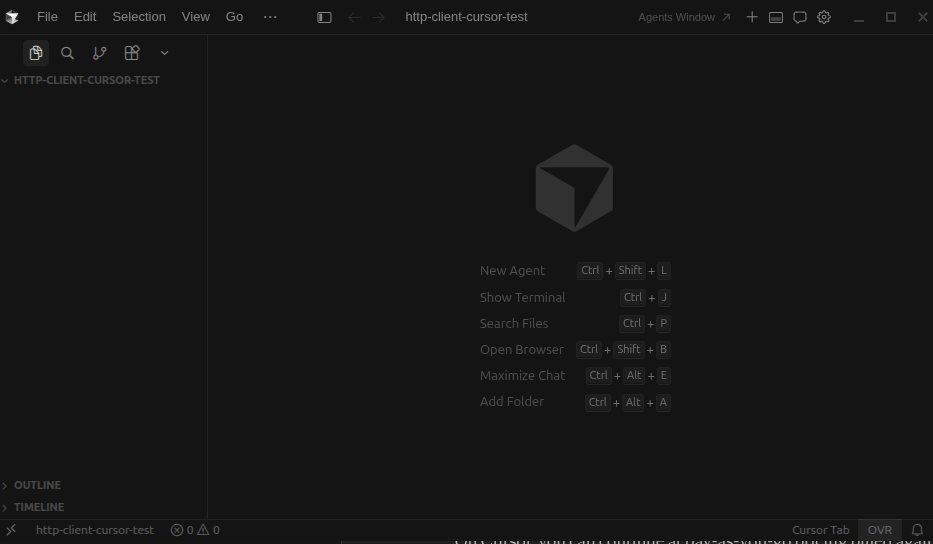
$ mkdir http-client-cursor-test http-client-windsurf-test
Then, launch the directories in their respective editors.
For Cursor, run:
$ cursor http-client-cursor-test
You should now see Cursor open with a fresh workspace:
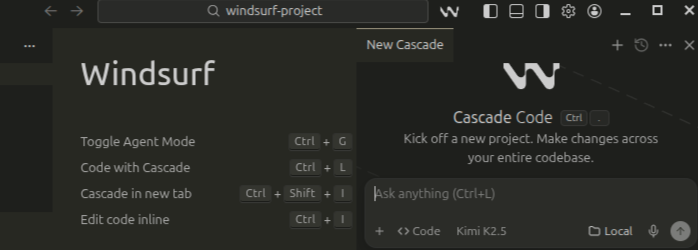
For Windsurf, run:
$ windsurf http-client-windsurf-test
Your Windsurf workspace should look like this:

In the next section, you’ll configure both agents to use the same mode and model. However, even with identical settings, each editor supplies its own context and system instructions, so the results reflect how each editor interprets the task, not just the prompt.
Launching Agent Modes
Before sending any prompts, make sure each editor’s agent is in the right mode. You’ll use the Kimi K2.5 model for both agents.
In Cursor, open the chat panel with Cmd+L or Ctrl+L and confirm that Agent mode is active in the mode selector at the bottom of the panel. Then, in the model selector next to it, search for the Kimi K2.5 model and make sure it’s selected:

In Windsurf, open Cascade with Cmd+L or Ctrl+L and confirm that Code mode is active using the toggle below the input box. Then, in the model selector next to it, search for the Kimi K2.5 model and ensure it’s selected:
In the next section, you’ll send both agents the same project setup prompt and compare how each executes it, from the files it creates to the decisions it makes along the way.
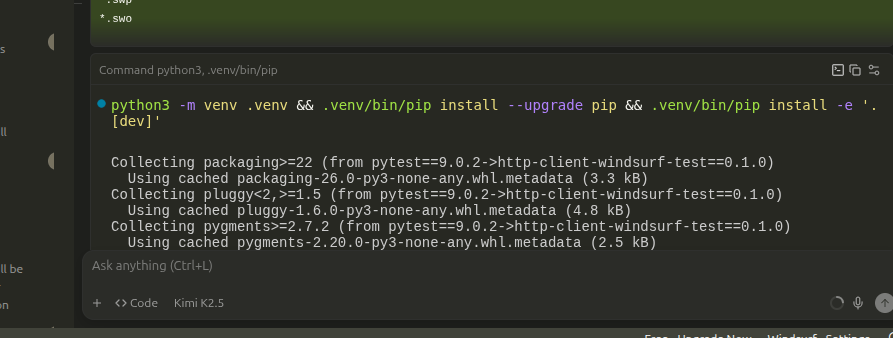
Setting Up the Project
To set up the project, send this prompt verbatim in both editors:
Set up a Python project in this directory following standard Python
packaging conventions:
- Create a virtual environment
- Install httpx==0.28.1 and pytest==9.0.2
- Add a tests/ directory
- Use the directory name as the package name
- Only include the dependencies explicitly listed here
In both editors, watch for the following:
- Whether the virtual environment is activated before installing packages
- Whether extra files such as
pyproject.toml,README.md, or.gitignoreare created beyond what you asked for - Whether the agent asks for approval before running commands
Observations:
In this example, Cursor chose a flat project layout with the package placed at the project root. In addition to the initial request, it also generated supporting files such as README.md, requirements.txt, and test_example.py.
You’ll also notice that Cursor works through inline diffs, keeping all changes staged until you explicitly approve them. Nothing is written to your files or executed in the terminal without your confirmation, which keeps each step fully under your control.
In the clip below, you’ll see Cursor walk through the setup and present each change for review:
Windsurf chose a src layout, nesting the package inside a src/ directory. Along with the initial request, it generated supporting files such as .gitignore and pyproject.toml, but didn’t create a README.md or requirements.txt.
You’ll also notice that Windsurf applies changes directly to the files as it works. The Cascade panel shows a running log of file edits and terminal commands while the agent continues executing the setup in the background.
In the preview below, you’ll see Windsurf build the project step by step, with files being created and updated as the setup progresses:
The two layouts look different, but neither is wrong. However, the src layout requires an editable install (pip install -e .) before the package can be imported. In this session, Windsurf handled the editable install automatically, but you should verify this in your own run before proceeding:
Next, you’ll send both agents the same prompt to build the async fetch function, then compare the outputs to see how each one handles the task before deciding which result to accept.
Writing the Async Fetch Function
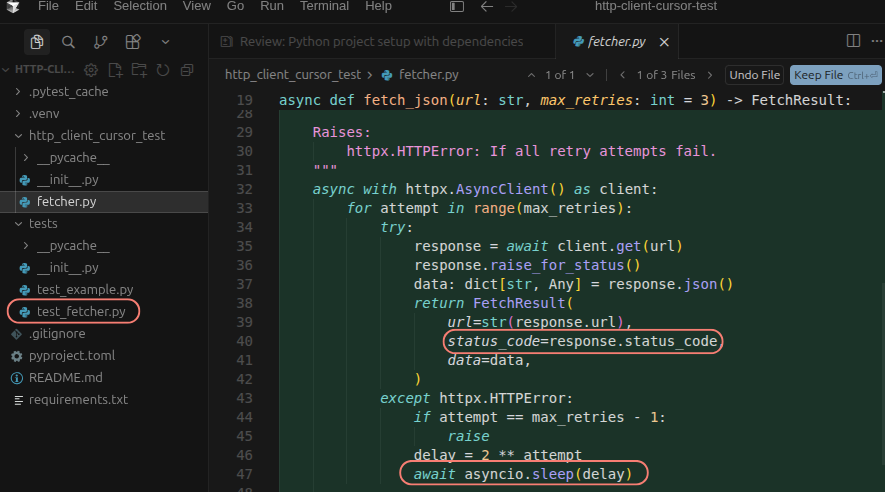
To write the async fetch function, send this prompt:
Create a file called `fetcher.py` and write an async function
called fetch_json that:
- Takes a URL string and an optional integer max_retries (default 3)
- Uses httpx.AsyncClient to fetch JSON from the URL
- Retries up to max_retries times with exponential backoff (1s, 2s, 4s)
  on any httpx.HTTPError
- Returns the JSON response as a typed dataclass called FetchResult
  with fields: url (str), status_code (int), and data (dict[str, Any])
- Uses proper type hints throughout
In both editors, verify the following checks before accepting the generated code:
- HTTP attribute: The agent should use
response.status_code, which is the correct attribute for anhttpx.Response. Inaiohttp, the equivalent isresponse.status. Confusing the two by usingresponse.statuswithhttpxwill raise anAttributeErrorat runtime. - Sleep call: The exponential backoff should use
await asyncio.sleep(), not the blockingtime.sleep(). The blocking version freezes your entire event loop during retries.
Observations:
Cursor gets this right. It correctly uses response.status_code and asyncio.sleep(), and goes a step further by generating a test_fetcher.py file with unit tests for fetch_json without being asked.
This is a view of the generated files and code:
Windsurf also writes the file correctly and stays within the exact scope of the prompt, generating no additional files:
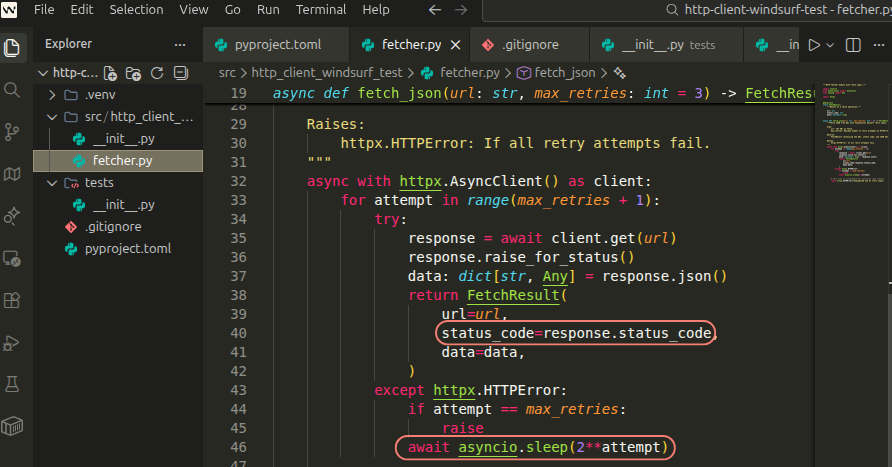
The delay implementation differs too. Cursor assigns the backoff duration to a named variable before passing it to asyncio.sleep(), which keeps the value accessible if you ever need to modify the backoff logic. Windsurf inlines the expression directly inside asyncio.sleep(). That’s more concise, but it means any change to that value requires rewriting the sleep call itself.
Running Tests
Before sending this prompt, open fetcher.py and replace await asyncio.sleep(delay) with time.sleep(delay), then add import time at the top. Now save the file.
This introduces a bug. Both editors will hit a test failure, and you’ll see directly how each one responds.
Now, send this prompt in both editors:
Create tests/test_fetcher.py with pytest tests for fetch_json that:
- Test successful fetch returns correct FetchResult
- Test fetch retries twice then succeeds
- Test fetch raises after exhausting retries
- Test two concurrent fetches complete in <4s
  (one with 1s+2s retry delays, one instant)
- Test fetch can be cancelled during retry delay
Use httpx.MockTransport for mocking.
In both editors, check for the following:
- Async markers: Test functions should use
@pytest.mark.asyncio. Plainpytestdoesn’t supportasync deftest functions without a plugin. - Network isolation:
httpx.MockTransportshould be used to keep tests from making real network calls. - Retry logic: The retry test should simulate actual failures before a success, not just mock a single successful response.
- Test output: The retry test will fail because of the deliberate bug in
fetcher.py. Note how each editor surfaces the failure and whether it attempts a fix without being asked.
Observations:
Cursor quickly identifies the blocking time.sleep, explains why it breaks async concurrency, and replaces it with await asyncio.sleep(delay) before running tests.
It also catches incorrect MockTransport usage in its generated tests, checks the httpx source for the correct API, rewrites the tests using a handler closure pattern, and asks for approval to run pytest:
Windsurf takes a different approach. Instead of fixing the blocking sleep in fetcher.py, it mocks time.sleep in the tests as a no-op and works around the root cause.
Getting the tests to pass requires several iterations, including incorrectly patching httpx.AsyncClient, missing a method on MockTransport, and a RuntimeError from raise_for_status(), each leading to further edits and test runs:
Both editors reach passing tests. Cursor fixes the bug. Windsurf works around it.
AI Code Completion
Both editors provide AI code completion and can feel similar at first. They both suggest multiline edits, use Tab to accept and jump, and draw context from your file. However, they optimize for different behaviors. In this section, you’ll run the same actions in each editor and compare the differences.
Cursor Tab
Cursor Tab focuses on incremental edits around the cursor. It can modify nearby code and present those changes as inline edits before you accept them. Each suggestion completes a small, logical unit, then moves you to the next step.
Open fetcher.py. The fetch_json function already tracks the client’s retry behavior, but you can extend it by adding a RetryMetadata dataclass. Under the FetchResult dataclass, start typing the following:
@dataclass
class RetryMetadata:
    attempts_made: ...  # Press Tab to accept field completion
    ...
You’ll see Cursor give completions for what you’re typing. Press Tab. Cursor completes the type annotation, inserts the next line, and moves your cursor forward. Press Tab again, and it continues building the class one line at a time. Each suggestion flows from your current position without requiring you to reposition the cursor:
To test Cursor’s Tab to Jump, rename status_code to http_status in FetchResult. After the change, Cursor prompts you to press Tab to move to the next reference of status_code.
Each time you press Tab, it proposes the corresponding update as a diff-style edit, showing the before and after of what will change before you accept it. Accept the edit, and the next Tab takes you to the following occurrence, guiding you through each update step by step. Here’s a preview of it in action:
This reflects Cursor Tab’s core behavior. It reacts to your current cursor position, applies diff-style edits around it, and guides you through each change in sequence.
Windsurf Tab
Windsurf Tab builds suggestions using broader workspace context, including recently viewed files, terminal output, code changes, and Cascade conversation history. This wider context enables its Supercomplete feature to generate multiline or cross-file edits.
Now, run the same two exercises in your Windsurf project. Open fetcher.py and, under the FetchResult dataclass, start typing the following:
@dataclass
class RetryMetadata:
    attempts_made: ...  # Press Tab to accept full block completion
    ...
As you fill in the fields, Windsurf starts suggesting completions. Press Tab. Instead of just filling in the next type, Windsurf Tab can be more proactive, sometimes suggesting multiple fields at once and inferring the full structure rather than only the next line, as shown below:
To test Windsurf’s Tab to Jump, rename status_code to http_status in FetchResult. Windsurf handles downstream references similarly to Cursor, moving you through each occurrence one at a time as you progress through the file:
The full Tab experience is only available in the Windsurf Editor. In IDE plugins, only basic autocomplete is supported, without Supercomplete or broader context features.
Within that experience, the key difference is how updates are applied and presented. Cursor Tab completes fields incrementally and shows each change as a diff-style edit, while Windsurf Tab may complete multiple fields at once and apply changes inline without a diff overlay.
Agentic Multi-File Editing
Performing multi-file changes from a single prompt is a key distinction between Cursor and Windsurf. Each editor manages planning, execution, and control in its own way.
To make these changes reliably, the agent needs context. Every Python codebase has conventions that models can’t know by default—for example, your HTTP client, retry logic, or whether you return raw dicts or typed dataclasses. Both editors let you persist this context across sessions, but they do it differently.
How Cursor’s Agent Works
Cursor’s agent has three modes, which you can switch with Shift+Tab:
- Agent: Default. Creates files and runs terminal commands, presenting each change as a diff you approve before it’s written to disk.
- Plan: Review-first. Generates a Markdown plan you can edit before execution.
- Ask: Read-only. Answers questions and analyzes code without making changes.
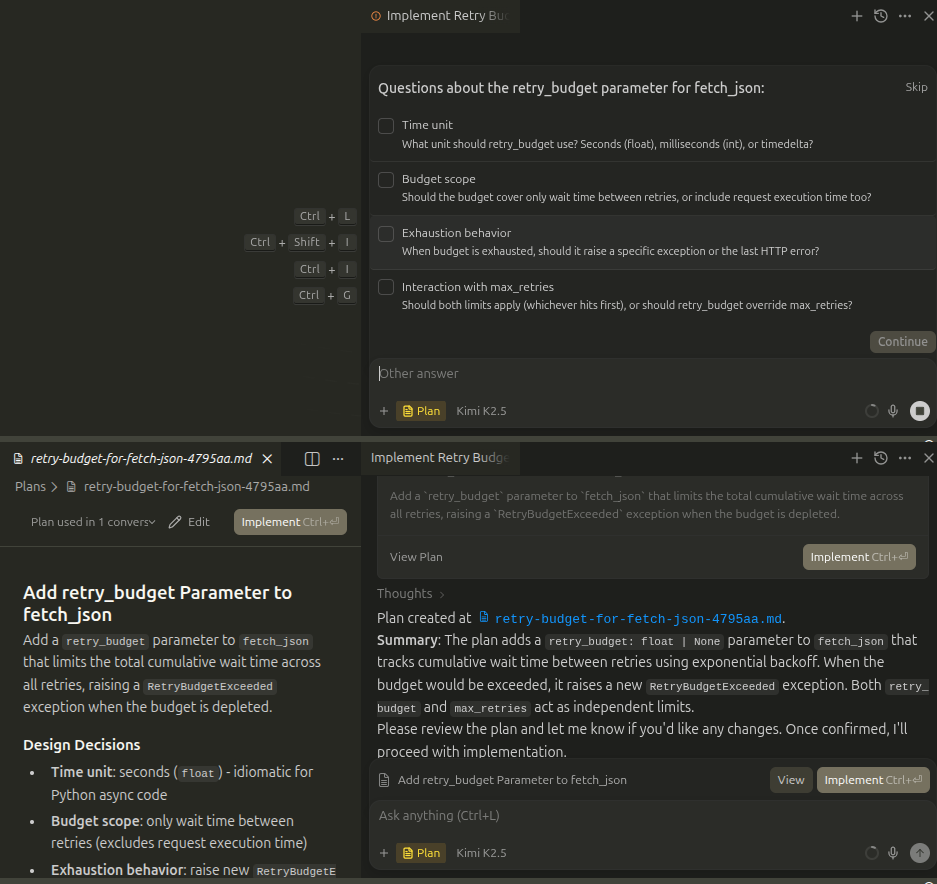
To test Plan mode, press Shift+Tab until Plan mode is active in the agent input, then send the following prompt:
Add a retry_budget parameter to fetch_json that limits the total
cumulative wait time across all retries.
As you can see below, Cursor produces a Markdown plan you can read and edit before approving it for execution:
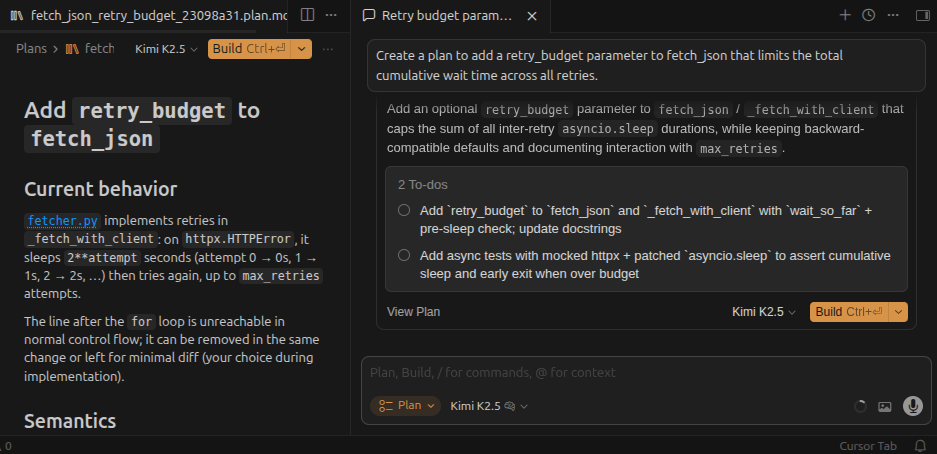
Plan mode is useful when a task is large or risky enough that you want to review the full scope before the agent executes anything.
Project Rules
When working across multiple files or sessions, the agent doesn’t retain decisions from previous conversations. Project Rules provide persistent context, so you don’t need to restate conventions each time. Instead, you define them once in a version-controlled file, and Cursor automatically includes them in the agent’s context when relevant.
Project Rules are stored as .mdc files in the .cursor/rules/ directory at the root of your project. Each rule file has YAML frontmatter with three fields: description, globs, and alwaysApply, which together determine one of four activation modes:
- Always Apply (
alwaysApply: true): Applied in every request - Apply to Specific Files (based on
globs): Applied when matching files are open - Apply Intelligently (based on
description): Used when the agent determines it’s relevant - Apply Manually: Applied only when referenced with
@rule-name
To create a Project Rule, go to Cursor Settings → Rules, click the + New button, and describe your rules as shown below:
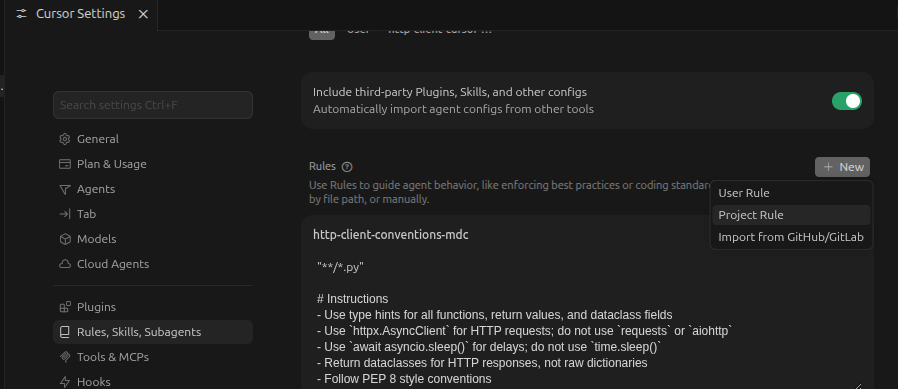
Saving the rule creates a new .mdc file in .cursor/rules/:
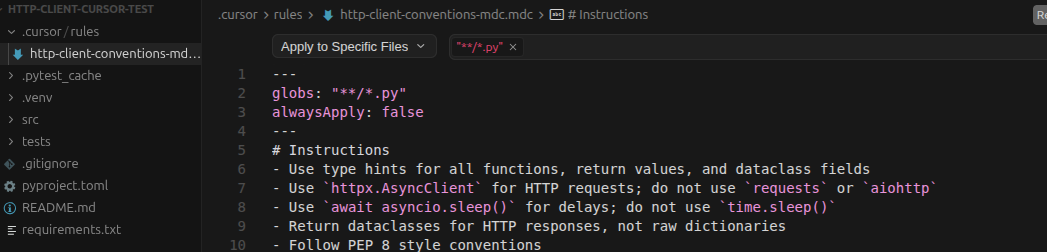
Here’s an example http-client-conventions.mdc rule for the HTTP client project:
.cursor/rules/http-client-conventions.mdc
---
globs: "**/*.py"
alwaysApply: false
---
# Instructions
- Use type hints for all functions, return values, and dataclass fields
- Use `httpx.AsyncClient` for HTTP requests; do not use `requests`
  or `aiohttp`
- Use `await asyncio.sleep()` for delays; do not use `time.sleep()`
- Return dataclasses for HTTP responses, not raw dictionaries
- Follow PEP 8 style conventions
Alternatively, you can press Cmd+Shift+P or Ctrl+Shift+P, search for New Cursor Rule, and select it. This opens the agent chat panel with a /create-rule command and a prefilled prompt to guide you through creating the rule.
How Windsurf’s Cascade Works
Cascade is Windsurf’s agentic system. It runs in three modes, which you can switch between with Cmd+. or Ctrl+.:
- Code: Fully agentic. Creates, edits, and deletes files, and runs terminal commands.
- Plan: Review-first. Writes a Markdown plan you can edit before execution.
- Ask: Read-only. Answers questions and analyzes code without making changes.
To test Windsurf’s Plan mode, press Ctrl+. to switch to Plan mode, then send the same prompt you used for Cursor:
Add a retry_budget parameter to fetch_json that limits the total
cumulative wait time across all retries.
Cascade first explores your codebase and may ask clarifying questions to refine the request before generating a structured implementation plan, as you can see in the preview below:
It produces a Markdown plan you can review and edit before approving it for implementation. Click Implement when you’re ready to run it.
Rules and Memories
Windsurf provides two mechanisms for project context: Rules and Memories. Rules function similarly to Cursor’s and define how Cascade should behave.
The key distinction is Memories, which learn from your Cascade conversations over time, automatically capturing coding conventions, preferred libraries, and project patterns without explicit setup.
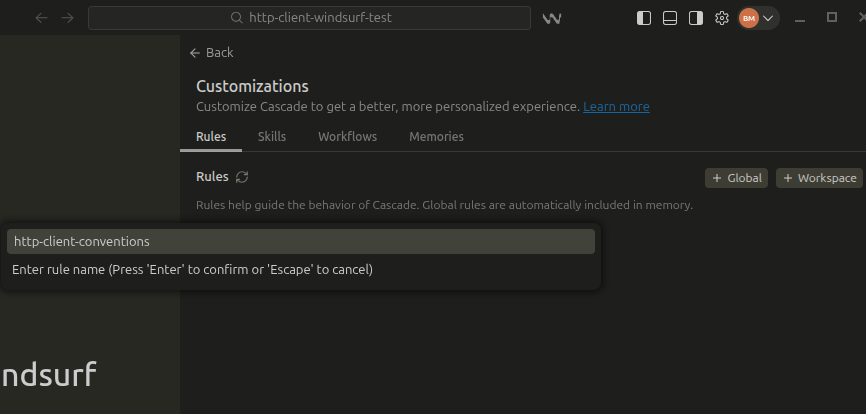
Rules are stored as .md files in .windsurf/rules/ and can be version-controlled. To create one, click the Windsurf Settings button in the bottom-right corner, go to Customizations, then select Manage. Navigate to the Rules panel, and click + Workspace to create a new workspace-level rule.
This preview shows the first step of defining the rule name:
Each rule file declares a trigger field in its frontmatter that controls when it activates:
trigger: always_on: Applied in every Cascade conversationtrigger: glob(based onglobs): Applied when matching files are opentrigger: model_decision(based ondescription): Applied when Cascade determines it’s relevanttrigger: manual: Applied only when referenced with@rule-name
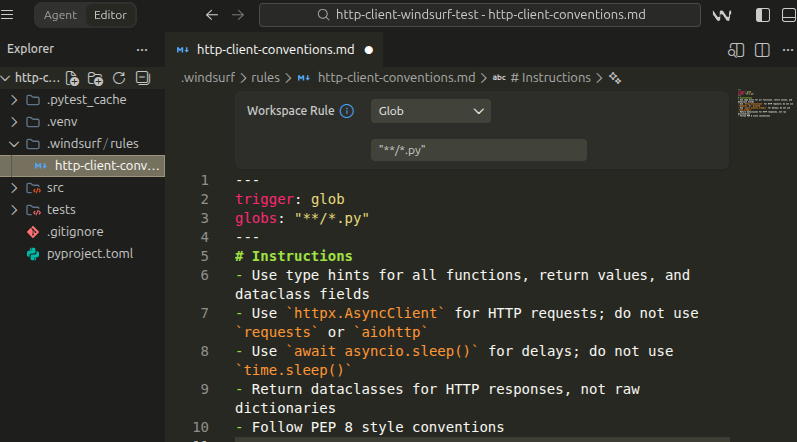
Here’s the equivalent http-client-conventions.md rule for the HTTP client project:
.windsurf/rules/http-client-conventions.md
---
trigger: glob
globs: "**/*.py"
---
# Instructions
- Use type hints for all functions, return values, and dataclass fields
- Use `httpx.AsyncClient` for HTTP requests; do not use `requests` or `aiohttp`
- Use `await asyncio.sleep()` for delays; do not use `time.sleep()`
- Return dataclasses for HTTP responses, not raw dictionaries
- Follow PEP 8 style conventions
Here’s the rule file preview where you can edit the triggers:
Alternatively, you can press Cmd+Shift+P or Ctrl+Shift+P, search for Create New Rule, and select it. Windsurf will then prompt you to enter the name of the rule. Press Enter to open a .md file where you can define your rules.
Memories are generated automatically by Cascade during your conversations and stored locally in ~/.codeium/windsurf/memories/. They’re workspace-specific. If you want Cascade to remember something permanently, then write it as a Rule instead.
Terminal Auto-Execution
Agentic multi-file work rarely stays inside the editor. The agent installs packages, runs tests, executes scripts, and interacts with the file system through the terminal. Both editors let you control how much autonomy the agent has over these commands, and by default, they require approval before execution.
Neither runs terminal commands autonomously unless you explicitly enable it.
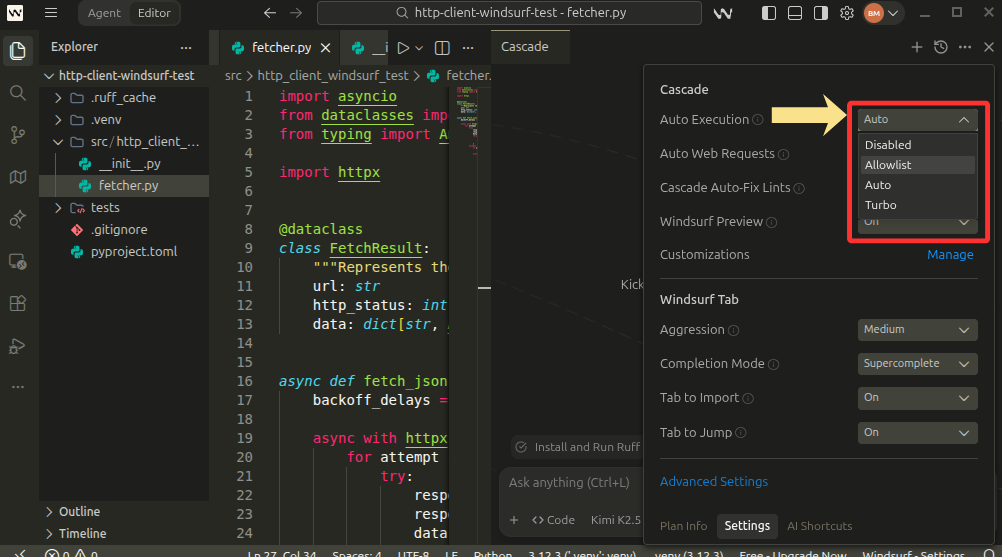
In Cursor, the Auto-Run setting is located under Cursor Settings and has three tiers:
- Ask Every Time: All commands require approval.
- Sandbox: Commands run automatically inside a read-only sandboxed environment.
- Unsandboxed: All commands run with no approval required.
You can see the three modes below:
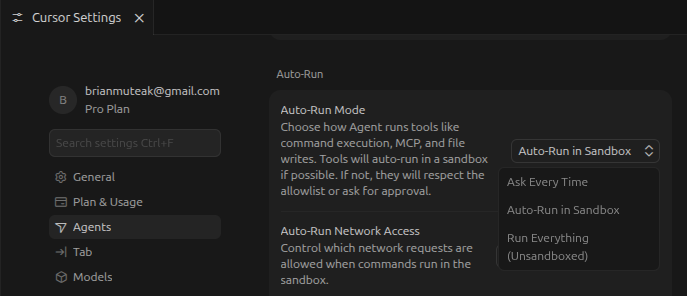
In Windsurf, the setting lives under Windsurf Settings → Cascade → Auto Execution with four options:
- Disabled: All commands require approval.
- Allowlist Only: Only pre-approved commands run automatically.
- Auto: Safe commands run automatically, while risky ones require approval.
- Turbo: All commands run automatically unless they’re explicitly denied.
Here’s a preview of the options:
Both editors put that control in your hands, and the agent only ever operates within the boundaries you set.
Note: The most permissive tiers, Unsandboxed in Cursor and Turbo in Windsurf, trade visibility for speed. Every command runs without review, including destructive file operations and package installs with post-install scripts. It’s safer to start on Ask Every Time in Cursor or Disabled in Windsurf until you’ve built trust in a given workflow.
Debugging and Error Correction
The VS Code Python Debugger works in both editors without modification. The AI features in each sit on top of it as a first-pass layer rather than a replacement. Each editor handles surfacing and fixing issues in generated code differently, as you’ll see.
Cursor: Inline Code Review and Bugbot
After an agent session, type /review in the agent input to run linters, check for common issues, and summarize what might need attention. Try it now on your fetcher.py to see what Cursor flags before moving on:
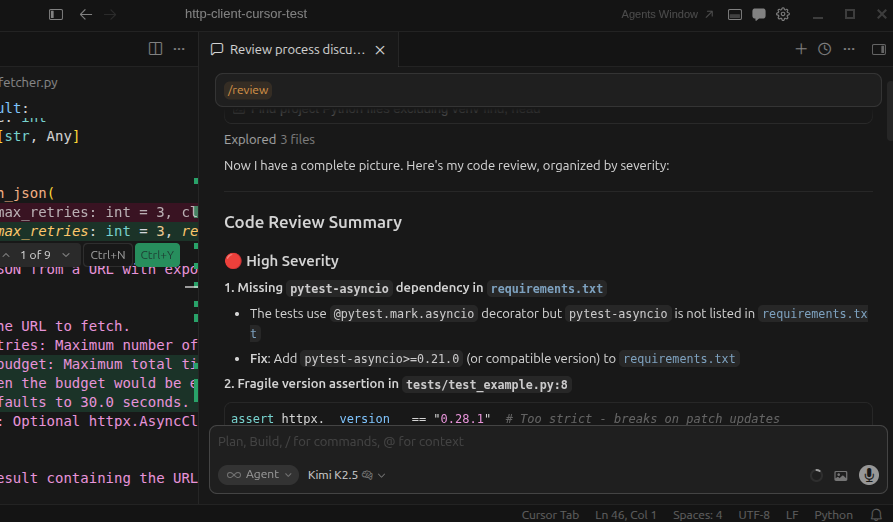
For deeper review at the pull request level, Cursor also provides Bugbot. Bugbot reviews every PR automatically on GitHub and GitLab, leaving inline comments at the exact location of each issue. Bugbot Autofix generates a fix, tests it, and proposes it as a commit directly on your PR branch.
Note: Bugbot is billed separately from Cursor Pro on usage-based pricing. Check cursor.com for the latest rates.
Windsurf: Auto-Linting
Cascade automatically fixes linting errors in the code it generates through its Auto-fix tool. After writing code, it checks the diagnostics from your configured linter, such as ruff, and corrects any issues it introduced without requiring you to run the linter yourself. This step is free and doesn’t count toward your usage quota.
The Auto-fix tool is enabled by default. To turn it off for a specific session, go to Windsurf Settings, find the Cascade Auto-fix Lints drop-down, and turn it off.
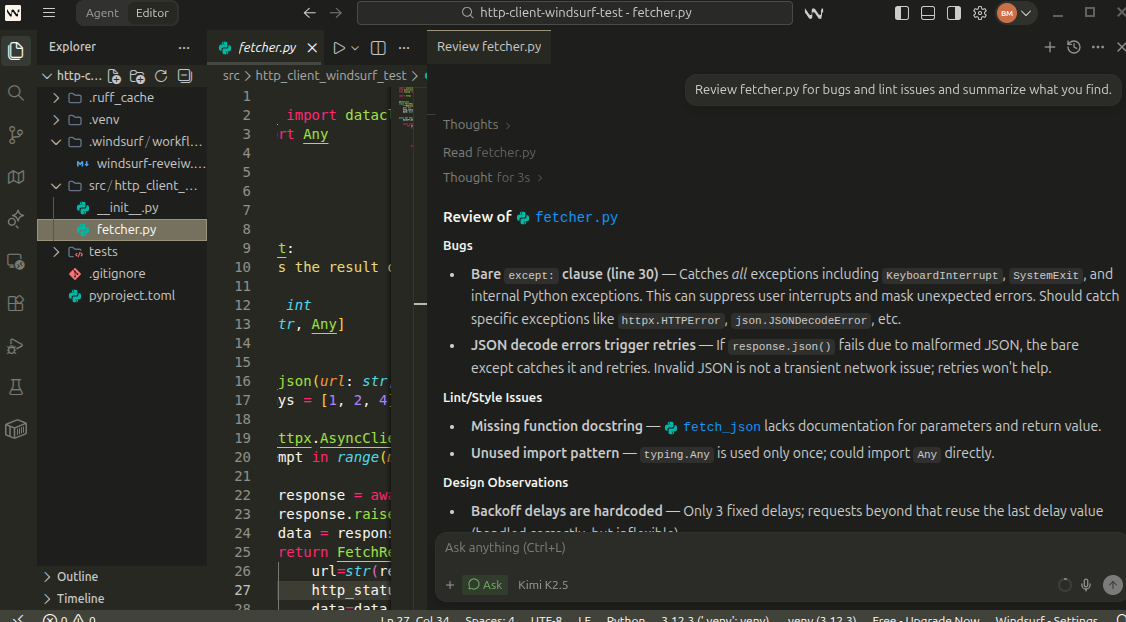
You can also ask Cascade to review existing code on demand. For example, to run a manual review on the fetcher.py file, switch to Ask mode and send this prompt:
Review fetcher.py for bugs and lint issues and summarize what you find.
Cascade will read the file, flag any issues it detects, and suggest fixes without applying any changes until you explicitly approve them, as you can see below:
For PR-level review, Windsurf provides PR Reviews, a GitHub bot that posts inline feedback on pull requests. Unlike Cursor’s Bugbot, it’s currently in beta, limited to GitHub Cloud, and only available on Teams and Enterprise plans.
Decision Table: Cursor vs Windsurf
If you’re still weighing the two, this table maps common Python developer situations to the editor that fits best:
| If you… | Cursor | Windsurf |
|---|---|---|
| Want AI changes staged as reviewable diffs | ✅ | — |
| Prefer edits applied directly in the files | — | ✅ |
| Prefer incremental, field-by-field tab completion | ✅ | — |
| Prefer broader completions that anticipate surrounding structure | — | ✅ |
| Want version-controlled project rules shared across a team | ✅ .cursor/rules/*.mdc |
✅ .windsurf/rules/*.md |
| Want project conventions learned automatically over time | — | ✅ Memories |
| Want full agentic AI support beyond VS Code, including PyCharm, Vim, Neovim, and Xcode | JetBrains plugin only | ✅ 9+ native IDE plugins |
| Want mature automated PR review with automatic fix commits | ✅ Bugbot | Beta PR Reviews |
Cursor is a stronger fit if you want AI changes staged as reviewable diffs, incremental control over edits, and predictable behavior through version-controlled rules. Windsurf is a stronger fit if you prefer edits applied directly in the files, broader context-aware completions, and project conventions learned automatically over time through Memories, with wider native IDE support.
Conclusion
You’ve compared two AI-powered code editors for Python: Cursor and Windsurf. Using identical prompts in both editors, you saw how each handles project setup, async code generation, multi-file edits, and debugging, including how each responded to a deliberately introduced time.sleep bug.
The right choice depends on your workflow. If you want AI changes staged as reviewable diffs and predictable behavior through version-controlled rules, pick Cursor. If you prefer edits applied directly in the files and project conventions learned automatically through Memories, pick Windsurf.
In this tutorial, you’ve:
- Built a resilient HTTP client in Python using
httpx.AsyncClient, exponential backoff, and typed dataclasses - Compared AI code completion with Cursor Tab and Windsurf Tab, including Supercomplete and Tab to Jump
- Evaluated agentic multi-file editing across Cursor’s Agent, Plan, and Ask modes and Windsurf’s Cascade
- Configured project rules and context with
.mdcrules,.mdrules, and Memories - Debugged generated code using Cursor’s
/reviewand Bugbot alongside Windsurf’s Auto-fix Lints and PR Reviews
If you want a structured path through AI-assisted Python development, Real Python’s Python Coding With AI learning path brings together tutorials and video courses on LLM development, prompt engineering, and AI-assisted coding. If Cursor stood out to you, the Tips for Using the AI Coding Editor Cursor course covers Agent mode and Plan mode through a hands-on Python project.
With these insights, you can confidently pick the right AI code editor for your next Python project.
Get Your Code: Click here to download the free sample code for the resilient HTTP client you’ll build with Cursor and Windsurf in this tutorial.
Frequently Asked Questions
Yes, via the Agent Client Protocol (ACP), which became available on paid Cursor plans in March 2026. Windsurf’s JetBrains plugin is more mature and currently offers deeper Cascade integration (with Code, Plan, and Ask modes), plus Workflows and Rules, directly within PyCharm.
Windsurf has a dedicated Jupyter integration via pip install codeium-jupyter. Cursor has improved its .ipynb support but remains inconsistent in notebook-heavy workflows. Some Cursor users prefer writing .py files with # %% cell markers and converting with Jupytext, which sidesteps the notebook format entirely.
On Cursor, you can continue at pay-as-you-go pricing billed against the underlying model API, or fall back to slower free-tier requests. On Windsurf, you continue at standard per-token API pricing. Windsurf’s Tab autocomplete and its own SWE-1 model remain available on all plans, including Free, even after your quota is exhausted.
Cursor offers Privacy Mode on all plans, enforced by default on the Business and Teams plans. Windsurf defaults to Zero Data Retention on Teams and Enterprise, with an opt-in on individual plans, including Free.
Take the Quiz: Test your knowledge with our interactive “Cursor vs Windsurf: Which AI Code Editor Is Best for Python?” quiz. You’ll receive a score upon completion to help you track your learning progress:
Interactive Quiz
Cursor vs Windsurf: Which AI Code Editor Is Best for Python?Test your understanding of how Cursor and Windsurf compare for Python across AI completion, agentic edits, and debugging workflows.